Skype Clone With React Using 100ms SDK

A software developer and technical writer who loves breaking down complex concepts into concise, understandable form.
Introduction
100ms is a cloud-based live video infrastructure software that allows us to create video and audio conferencing applications on the web, iOS, and Android platforms using the 100ms software development kit (SDK), REST APIs, and account dashboard. The platform provides an easy and flexible kit to enable developers to create awesome, feature-rich, and custom-built video and audio conferencing applications without breaking much sweat. Amongst the popular array of video conferencing apps, Skype is one of the front-runners. A daily usage from about 40 million people makes it a heavyweight in the world of videotelephony.
In this tutorial article, we would be building an app like Skype using the 100ms React SDK; this app would possess several features which include:
- Ability to join and exit a meeting room
- Ability to toggle the audio and video on and off
- Ability to share one’s screen tab or the entire window
- Messaging or chat interface
- A view of other participants present in the meeting room
- An ability to raise one’s hand
- Setting a meeting name and username
Prerequisites
This tutorial would assume you have basic knowledge of CSS, JavaScript, and React.js (functional components and hooks). We would also be using Material UI which is an open-source, component library for React applications. However, prior knowledge of Material UI is not compulsory.
Getting Started
Now to get started, we would be utilizing a starter template which I already set up using the create-react-app structure. The starter template contains all the CSS styling and basic JSX markup, this would allow us to focus on the logic. Hence, to get started, simply fork the template on GitHub, then clone it into your local machine. Afterward, open the terminal and run npm install or yarn add to install the required dependencies as indicated in the package.json file.
Clone this starter template:
HTTPS: git clone https://github.com/EOEboh/starter-template.git
SSH: git clone git@github.com:EOEboh/starter-template.git
Basic Terms to Know in the SDK
Just before we get our hands dirty with building the application, there are some terms we need to get familiar with in the 100ms SDK, so we can have a good understanding of what we are building.
- Room: A room is the basic object that the 100ms SDK returns on a successful connection. This contains references to peers, tracks, and everything you need to render a live audio/video app.
- Peer: A peer is the object returned by 100ms SDK that contains all information about a user - name, role, video track, etc.
- Track: A track represents either the audio or video that a peer is publishing.
- Role: A role defines who can a peer see/hear, the quality at which they publish their video, whether they have permission to publish video/screen share, mute someone, change someone's role.
- Template: A template is a collection of roles, room settings, recording, and RTMP settings (if used), that is used by the SDK to decide which geography to connect to, which tracks to return to the client, whether to turn on recording when a room is created, etc. Each room is associated with a template.
Setting Up The App
Create A Template
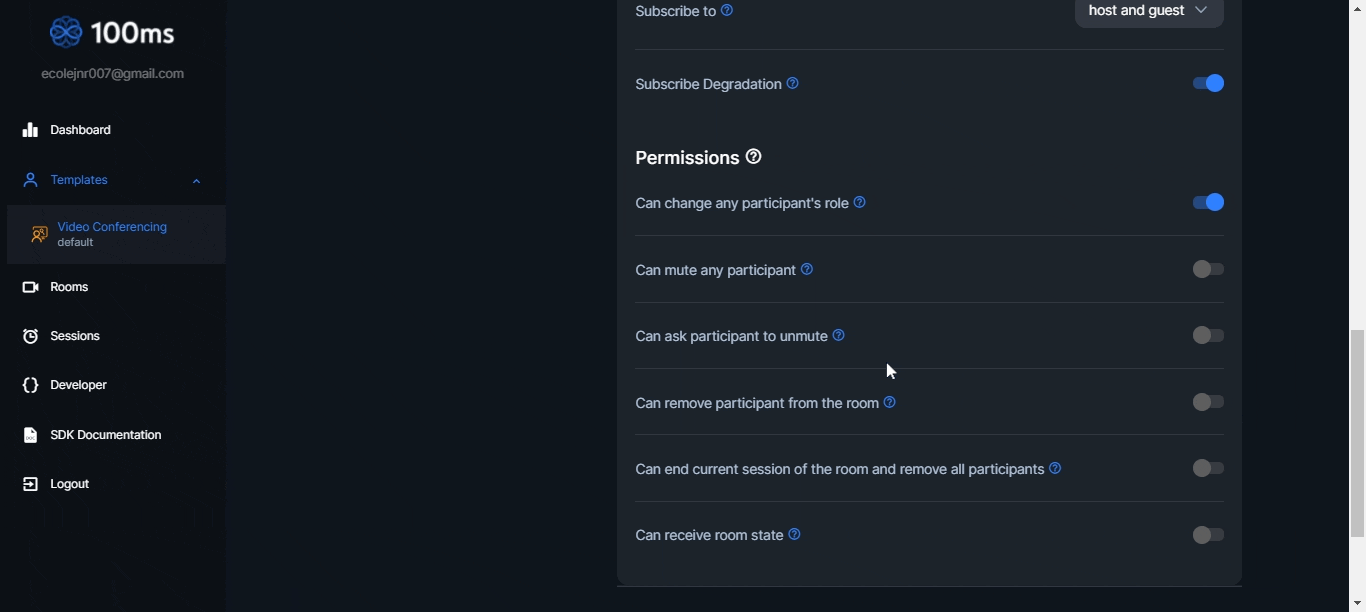
To get started on this awesome project, create an account in the 100ms dashboard. Moving forward, we would create a template where we will define the roles and settings, simply select Video Conferencing. The roles to be defined for this project are the host, guest, and handraise roles. Each role has its permissions and settings with the host having the highest set of permissions.
Create A Room
Now, we have to create a room based on the template created above, as earlier mentioned, a room is the object returned when a connection to the SDK is successful, it defines the place where you and other participants meet and interact in the app. To create a room, go to the Rooms tab and click on Create A Room, input the room name. On successful creation of a room, a room id is automatically generated.
Integrate the SDK
At this stage, we have to connect the SDK to our app project, navigate to the index.js file, and import
HMSRoomProvider from 100mslive/react-sdk as illustrated in the code below:
// index.js

import React from 'react';
import ReactDOM from 'react-dom';
import { HMSRoomProvider } from '@100mslive/react-sdk';

import { BrowserRouter as Router } from 'react-router-dom';

import App from './App';

const rootElement = document.getElementById('root');
ReactDOM.render(
    <Router>

        <HMSRoomProvider>
            <App />
        </HMSRoomProvider>

    </Router>, rootElement
);
Create The Homepage
This is the first page the user would encounter when using the app, here, the name of the meeting is set, a button that leads to the login form is also created. For the majority of this project, we would be utilizing the React component library called Material UI, all the imports are already contained in the starter code, so we can just dive straight to the logical aspect.
The SDK provides us with a set of hooks we can use to implement different features, in this case, we would be using the useHMSActions and useHMSStore hooks. Navigating to our App.js file, the isConnected variable declared enables us to render the meeting name only if the app is connected to the room SDK. We can declare the hooks as illustrated below:
// App.js
const isConnected = useHMSStore(selectIsConnectedToRoom);
const hmsActions = useHMSActions();
For the conditional rendering of the first page JSX component, the useLocation hook from react-router is utilized.
// for conditional rendering
  let location = useLocation();
Now, we would call the “Leave” action on the SDK to exit the user from the meeting room in case the user refreshes or closes the tab.
// incase the user refreshes or closes the tab
  useEffect(() => {
    window.onunload = () => {
      if(isConnected) {
        hmsActions.leave();
      }
    };
  }, [hmsActions, isConnected])
Great work so far! Now we have to create the meeting name feature to enable the user to set the name of the meeting.
// state for the meeting name
  const [ meetingName, setMeetingName ] = useState('');

  // function for the meeting name
  const handleMeetingName = (e) => {
          setMeetingName(e.target.value)
  }
Just below the return, the following JSX and Material UI code would be rendered.
<div>
      <div style={styles.connected}>
        {isConnected ? `${meetingName}` : 'Not Connected Yet'}
      </div>

      <div>
        {isConnected ? ( <MeetingRoom /> ) :(
      <Routes>
        <Route path='/joinform' element={<JoinForm />} />
      </Routes>  )}
      </div>
  </div>


    { location.pathname == '/' && (
    <Card sx={styles.card}>
      <CardContent sx={styles.cardContent}>

        <Typography  gutterBottom>
          <b>
            Hi, you are welcome!<br/>
            Input A Meeting Name </b>
        </Typography>

        <div>
            <TextField
                id='name'
                type='text'
                name='name'
                placeholder='Meeting Name'
                required
                value={meetingName}
                onChange={handleMeetingName}>
            </TextField>
        </div>

      </CardContent>


      <CardActions>
       <Box sx={styles.cardContent}>
       <Link to='/joinform'  style={{textDecoration: 'none'}}>
        <Button
          type='submit'
          variant='contained'
          sx={styles.joinFormButton}>
          Create A Free Video Call
        </Button>
        </Link>
        </Box>
      </CardActions>
      </Card>
     )}
Joining the Meeting Room
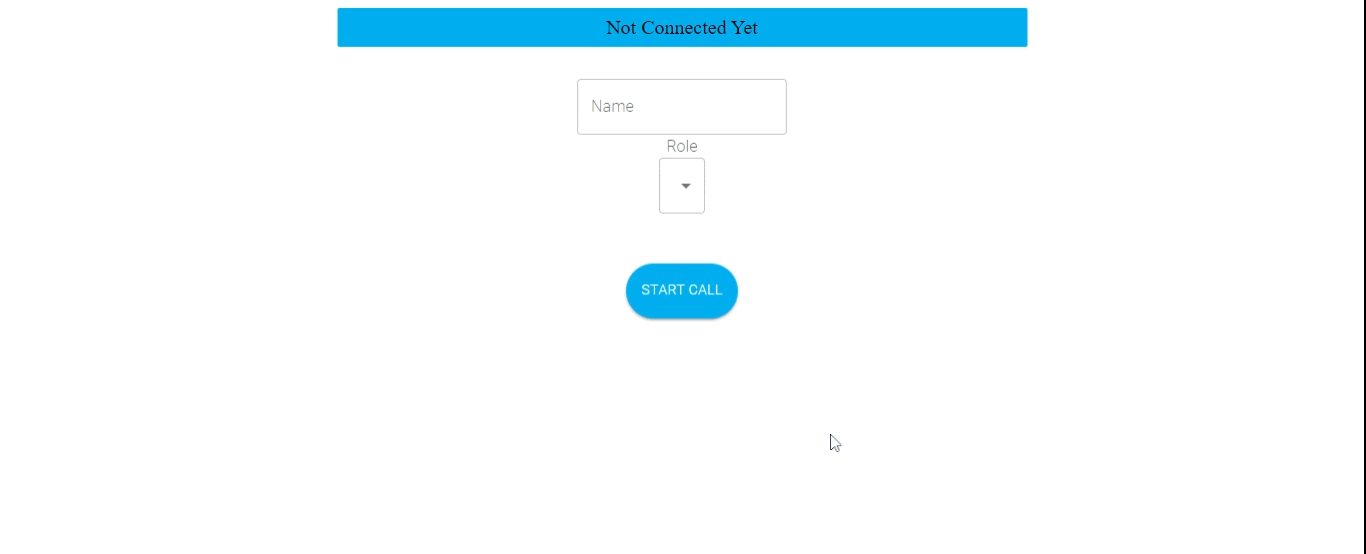
For us to join a room, we would need a page where we can input our values to enable us to get connected. This is the next page to be rendered as soon as the user sets the meeting name and proceeds. This page contains a set of input fields for the user’s username, and role as well as a submit button that would connect to the meeting room on submit.
Let us navigate to the components > joinForm.jsx file, and right inside the JoinForm.jsx, we would simply use the useState hook from react to dynamically set the username and role input values, as illustrated below.
// JoinForm.jsx

   // Hook for hmsActions
    const hmsActions = useHMSActions();

    // Hook for styling
    const classes = useStyles();

    // state for the input name values
    const [ username, setUsername ] = useState({name: ''});
    const [ role, setRole ] = useState('');

       // function to update username input value
        const handleUsernameChange = (e) => {
            setUsername((prevValues)=> ({
                ...prevValues,
                [e.target.name]: e.target.value
            }));
        };

       // function to update role input value
        const handleRole = (e) => {
            setRole(e.target.value)
        }
However, to successfully connect to the room via the SDK, an authentication token is required. You can get an authentication token manually by heading to the dashboard, navigating to the Room tab, click on “Create Room”, ensuring it is on the template you created, then you click on the “Join Room” button, this would automatically generate the authentication token represented by the key symbol.
However, we do not always want to keep generating a token anytime we want to log into the meeting room, so to join a room, we need to call the join method on hmsActions and it requires us to pass a config object. The config object must be passed with the following fields:
- userName: This is the name the user wants to appear as, it will be assigned to each peer object, the value is gotten from the user’s input
- authToken: This is the authentication token required to join the meeting room, we will be generating this automatically as soon as the submit button is clicked.
- settings: This defines the default settings as soon as the user logs into the room, we would be setting the audio to be muted and video the video to show by default.
Now, to generate the token, we would be making a POST request to the token_endpoint using the Fetch API method in a function known as getToken, this function takes role as an argument, and fetches the authentication token as soon as we press the submit button.
Hence, we will navigate to the endpoints > getToken.js file and input your unique room_id and endPoint, you can find these parameters on your 100ms dashboard > Developers section. We would reference these parameters on a .env file later, to keep them secure. Your endpoints > getToken.js file should look like this:
// getToken.js

const endPoint = 'https://prod-in.100ms.live/hmsapi/skype-clone.app.100ms.live/';
const room_id = '620a9ef771bd215ae0421be0';

export default async function getToken(role) {
  const response = await fetch(`${endPoint}api/token`, {
    method: 'POST',
    body: JSON.stringify({
      user_id: '620a9b8971bd215ae0421bd5',
      role: role,
      room_id,
    }),
  });

  const { token } = await response.json();

  return token;

}
Afterward, we will head back to the JoinForm.jsx and create a function that would call the getToken function alongside the join method which returns the config object.
// JoinForm.jsx

const JoinRoom = () => {
            getToken(role)
                .then((token) => {
            hmsActions.join({
                userName: username.name,
                authToken: token,
                settings: {
                    isAudioMuted: true,
                    isVideoMuted: false,
                },
                metaData: JSON.stringify({city: 'Lagos'}),
                rememberDeviceSelection: true
            });
         })
         .catch((error) => {
             console.log(error)
         })
        }

        // submit function
        function handleSubmit(e){
            e.preventDefault();
            JoinRoom();
        }
The page would be rendered using some Material UI components, and basic CSS styling.
return (
      <>
        <form className={classes.form}>
                <div className={classes.div}>
            <TextField
                id='name'
                type='text'
                name='name'
                label='Name'
                placeholder='Your name'
                value={username.name}
                onChange={handleUsernameChange}>
            </TextField>
                </div>
                <div>

                <InputLabel id="role">Role</InputLabel>
            <Select
                labelId="role"
                    id="role"
                    value={role}
                 label="Role"
                 onChange={handleRole}
                 >
                <MenuItem value='host'>Host</MenuItem>
                <MenuItem value='guest'>Guest</MenuItem>
             </Select>
                </div>

                <br/>
                <Button
                    onClick={handleSubmit}
                    type='submit'
                    variant='contained'
                    sx={styles.joinFormButton}>
                    Start Call
                </Button>
        </form>
      </>
Create the Meeting Room
Navigate to the components > meeting folder, then inside the MeetingRoom.jsx file, this is where the room would be rendered alongside all the peers video and audio tracks and other functionalities.
In this component, selectRemotePeers and SelectLocalPeer from the useHMSStore hook provided by the SDK would be rendered.
The RemotePeers represent other participants present in the meeting room, while LocalPeer represents you. However, before we continue, let us create our RemotePeers and LocalPeer components.
Each component would be accepting the peer and localpeer props from the MeetingRoom.jsx. To do this, simply go to the components > peer folder, we would begin with the LocalPeer.jsx component which is where we would render the local peer (you).
Local Peer
Right inside our LocalPeer.jsx, to render the local peer object, we would utilize the useVideo hook from the SDK, which we will render in the HTML video element.
The localpeer.name is displayed dynamically below the video track, to render your name as soon as you enter the room.
const LocalPeer = ({localpeer}) => {

      // for local peer (You)
    const ref = useVideo(localpeer.videoTrack);

    let width = '350px'

  return (
    <div>

      <video
        ref={ref}
        className={` ${localpeer.isLocal ? "local" : ""}`}
        style={styles.video}
        autoPlay
        muted
        playsinlinev
        width={width}
      />
      <div>
        <h2><b>{localpeer.name} {localpeer.isLocal && "(You)" }</b></h2>
      </div>

    </div>
  );
}
Remote Peers
Similar logic is applied in creating the remote peers (other participants), below each peer video, the name of each participant and their role is rendered using the peer.name and peer.roleName respectively.
To create our remote, navigate to the peer > Peer.jsx file and copy the following code:
const ref = useVideo(peer.videoTrack);
  const width = '250px';

return (

    <div>

      <video
        ref={ref}
        style={styles.video}
        autoPlay
        muted
        playsinlinev
        width={width}

      />
      <div>
        <b>{peer.name} {!peer.isLocal && `(${peer.roleName})`}</b>
      </div>

    </div>
Now, we can create our room and render the two components we just created in it. Heading back to the meeting > MeetingRoom.jsx file, our code should contain the following:
// MeetingRoom.jsx
    const peers = useHMSStore(selectRemotePeers);
    const localpeer = useHMSStore(selectLocalPeer);
    const hmsActions = useHMSActions();


return (
       <>
  <div style={styles.room}>
      <div style={styles.name}>
        <h2>Welcome {localpeer.name}</h2>
      </div>

      <Box sx={{ flexGrow: 1 }}>
        <Grid container spacing={2}>
         <Grid item xs={6} md={4} sm={6}>
           <Item>
            {peers.map((peer) => (
            <Peer key={peer.id} peer={peer} />
          ))}
           </Item>
        </Grid>

        <Grid item xs={12} md={6} sm={12}>
          <Item>
            <LocalPeer localpeer={localpeer} />
          </Item>
        </Grid>

        </Grid>
 </Box>
</div>
A Status Bar to Contain All Functional Buttons
Right now, we would need to create a status bar where every potential button would be displayed and can be used by each user. To do this, head over to the statusBar > StatusBar.jsx file, we would be utilizing Material UI components as usual and rendering a set of button components which we would implement moving forward.
// StatusBar.jsx

<AppBar position="static" style={{background: '#787878'}}>
  <Container maxWidth="xl">
    <Toolbar disableGutters>
           <Participants handleClickOpen={handleClickOpen}/>
       <Typography
            variant="h6"
            noWrap
            component="div"
            sx={styles.typography}
       >
            <MuteAudio />
            <HideVideo />
             <Leave />
       </Typography>
           <HandRaised />
            <ShowChat toggleChat={toggleChat}/>
            <ScreenShare toggleScreen={toggleScreen}/>

    </Toolbar>
  </Container>
  </AppBar>
Muting/Unmuting Audio and Video Tracks
Awesome! The next feature we will be adding is the ability for each peer to mute/unmute their audio, and also to hide/unhide their video tracks, this would be rendered in the MuteAudio.jsx and HideVideo.jsx which we rendered in the StatusBar.jsx earlier.
We can achieve this by using a custom hook from the 100ms SDK called useAVToggle, this would enable us to toggle our audio and video on and off. It is straightforward!
Right in the statusBar > MuteAudio.jsx, we can create our audio toggle button, which renders two different icons depending on the boolean state. The icons are from react-icons.
// MuteAudio.jsx

      const {
        isLocalAudioEnabled,
        toggleAudio,
    } = useAVToggle();

  return (
    <button
     onClick={toggleAudio}
     style={styles.button}>
             {isLocalAudioEnabled ? <BsFillMicFill /> : <BsFillMicMuteFill />}
         </button>
The same is done for the Video track, right in the statusBar > HideVideo.jsx file, we would render similar logic.
// HideVideo.jsx

    const {
        isLocalVideoEnabled,
        toggleVideo
    } = useAVToggle();

  return (
    <button
     onClick={toggleVideo}
     style={styles.button}>
            {isLocalVideoEnabled ? <BsCameraVideoFill /> : <BsCameraVideoOffFill />}
        </button>
Leaving the Room
Participants need to have a way to leave the meeting room at will, and this can be done by calling the leave method in the useHMSActions hook. Pretty straightforward! Therefore, we would create our Leave button in the statusBar > Leave.jsx file.
// leave.jsx

const hmsActions = useHMSActions();
  return (
    <button onClick={() => {
        hmsActions.leave();
      }}
      style={styles.button}>
       <FcEndCall />
    </button>
  )
Ability to Raise Hand
Now, let us add “hand-raising” functionality, just like Skype and other video telephony apps have. When a user(guest) raises their hand, they automatically get a chance to upgrade their permissions such as their ability to share their screen, notify the host of their wish to speak, and so on.
Firstly, let’s create our actual “Hand” to be raised by heading to the peer > HandRaisedBadge.jsx. Right inside this file, we would simply render a hand icon from react-icons.
return (
    <div style={{ position: 'relative'}}>
        <MdFrontHand style={{ fontSize: '35px',  top: 0 }} />
    </div>
  )
Secondly, we would head over to the statusBar > HandRaised.jsx file, where we would create our hand raise functionality. We would make this possible by using a variable, isHandRaised which contains a boolean value and a changeRole method from the useHMSActions hook. The changeRole method utilizes the roleName property to toggle between the user’s initial role and the ‘handraise’ role.
// handRaised.jsx

 const peer = useHMSStore(selectLocalPeer);
    const hmsActions = useHMSActions();

    const isHandRaised = peer;

    const toggleHandRaised = () => {
        hmsActions.changeRole(
            peer.id,
            peer.roleName === 'guest' ? 'handraise' : 'guest', true
        )
    }

  return (
      <>
    <button onClick={toggleHandRaised}
     style={styles.button}>
        { !isHandRaised ? (<MdOutlineFrontHand />) : (<MdFrontHand />) }
    </button>
    </>
  )
Thirdly, we need to find a way to render the HandRaiseBadge any time a user clicks on the hand raise button above. The “hand” is rendered right above a peer on click and disappears on click again. Therefore, we would conditionally render the HandRaiseBadge, just above the video element in the Peer and LocalPeer components respectively.
// peer.jsx and localPeer.jsx
      <div>
        {peer.roleName === 'handraise' && <HandRaiseBadge />}
      </div>
Knowing the Number of Participants
Imagine you are in a huge meeting with hundreds of participants, you may want to know how many people are in the room with you, alongside their names, just like in Skype. This is possible using the selectRemotePeers parameter from the useHMSStore hook. For this functionality, we would be using a Material UI dialog component to render the list of peers along with their names and how many peers are present.
Before that, let us create our button in the statusBar > Participants.jsx file.
return (

    <button onClick={handleClickOpen}
     style={styles.button}>
        <BsPeople />
    </button>
    )
Afterwards, navigate to the meeting > MeetingRoom.jsx and this is where the dialog pop-up would be rendered, we would be mapping through the remote peers to output a list of the participating peers present in the room.
// meetingRoom.jsx

// material ui functions
  const { onClose } = 'props';

  const [open, setOpen] = React.useState(false);

  const handleClickOpen = () => {
    setOpen(true);
  };

  const handleClose = () => {
    setOpen(false);
  };

  const handleListItemClick = (value) => {
onClose(value);
  };

return (
       <>
  <div style={styles.room}>
      <div style={styles.name}>
        <h2>Welcome {localpeer.name}</h2>
      </div>

      <Box sx={{ flexGrow: 1 }}>
        <Grid container spacing={2}>
         <Grid item xs={6} md={4} sm={6}>
           <Item>
            {peers.map((peer) => (
            <Peer key={peer.id} peer={peer} />
          ))}
           </Item>
        </Grid>

        <Grid item xs={12} md={6} sm={12}>
          <Item>
            <LocalPeer localpeer={localpeer} />
          </Item>
        </Grid>

        </Grid>
 </Box>

  <div>
       <Dialog onClose={handleClose} open={open}>
      <DialogTitle>{peers.length} Participants In This Meeting With You</DialogTitle>
      <List sx={{ pt: 0 }}>
        {peers.map((peer) => (
          <ListItem button onClick={() => handleListItemClick(peer)} key={peer.id}>
            <ListItemAvatar>
              <Avatar sx={{ bgcolor: blue[100], color: blue[600] }}>
                <PersonIcon />
              </Avatar>
            </ListItemAvatar>
            <ListItemText primary={peer.name} />
          </ListItem>
        ))}
</List>
    </Dialog>

 </div>
Now, you would notice that we have not rendered the StatusBar.jsx which contains the features we have been implementing. For us to make these features functional, we have to render the StatusBar.jsx in the MeetingRoom.jsx. Hence, we would be rendering it just below the rest of the elements.
<StatusBar handleClickOpen={handleClickOpen}/>
Ability to Screen Share
The next feature we would be adding to this clone project is the one that enables users to be able to share their screens during a meeting. Let us start by creating our Screen.jsx for rendering the screen share. In the peer > Screen.jsx file, the selectScreenShareByPeerID is used to call a screen share action by a user, along with the useRef hook from React which returns the video object with a .current property.
// Screen.js

    const hmsActions = useHMSActions();
    const screenRef = React.useRef(null);
    const screenTrack = useHMSStore(selectScreenShareByPeerID(peer.id));

    useEffect(() => {
        (async () => {
          console.log(screenRef.current);
          console.log(screenTrack);
          if (screenRef.current && screenTrack) {
            if (screenTrack.enabled) {
              await hmsActions.attachVideo(screenTrack.id, screenRef.current);
            } else {
              await hmsActions.detachVideo(screenTrack.id, screenRef.current);
            }
          }
        })();

      }, [screenTrack]);

  return (
     <div>
<div>

          <video
            ref={screenRef}
            autoPlay={true}
            playsInline
            muted={false}
            className={` ${
              isLocal ? "You are sharing your screen" : ""
            }`}
          >
          </video>
          </div>
        </div>
Now, let us create a state in MeetingRoom.jsx which contains a boolean value. Afterwards, we would create a function to toggle the state, as well as the isLocalScreenShared variable to conditionally call the screen share depending on the true or false value of the state.
// meetingRoom.jsx

  // for screen sharing
    const isLocalScreenShared = useHMSStore(selectIsLocalScreenShared);


      // function to toggle screenshare
     const toggleScreen = async () => {
      await hmsActions.setScreenShareEnabled(!isLocalScreenShared);
  }
The toggleScreen function is passed as props to the StatusBar.jsx where it would also be passed to the button we would create soon. Let us also render the Screen.jsx created earlier, just above the StatusBar.jsx.
<div style={{ width: 'calc(90vw - 100px)' }}>
           <Screen isLocal={false} peer={peers}/>
         </div>
           <br/>
        <StatusBar toggleScreen={toggleScreen}
          handleClickOpen={handleClickOpen}/>
    </div>
Lastly, we have to create our screen share button component, so when the user clicks on the button, it will toggle the screen share. Right inside the statusBar > ScreenShare.jsx file, we have:
// screenShare.jsx

 const isLocalScreenShared = useHMSStore(selectIsLocalScreenShared);

  return (
    <button
      onClick={toggleScreen}
      active={!isLocalScreenShared}
      style={styles.button}
    >
        {isLocalScreenShared ? "Unshare" : <FiShare />}
    </button>
  )
Send Messages
The final feature we would be implementing is the chat feature, which enables users to send messages to everyone present in the room, as well as get a reply from anyone.
Let us head to the chat > ChatContainer.jsx, this contains the entire layout of our chat. The sendBroadcastMessage enables us to send a message, and the selectHMSMessages helps us display all messages alongside their sender’s name.
// chatContainer.jsx

    const ChatContainer = () => {
    const hmsActions = useHMSActions();
    const storeMessages = useHMSStore(selectHMSMessages);
    const [chatInput, setChatInput] = useState('');


    const sendMessage = () => {
      hmsActions.sendBroadcastMessage(chatInput);
      setChatInput('');

    };


    useEffect(() => {
    const el = document.getElementById('chat-feed');
      if (el) {
        el.scrollTop = el.scrollHeight;
      }
    }, [storeMessages]);

     const handleChatInput = (e) => {
        e.preventDefault();
       setChatInput(e.target.value)
    }


    return (
      <ChatLayout>
        <ChatFeed>
          {storeMessages.map((message) => (
            <Chat key={message.id} msg={message} />
          ))}
        </ChatFeed>
        <ChatInput
          value={chatInput}
          onChange={handleChatInput}
          onKeyPress={() => {
            sendMessage();
          }}
        />

      </ChatLayout>
    );
  };
Now that we have structured our chat components, we need to find a way to render them in the meeting room when the chat button is clicked and make it disappear when clicked again. This means we have to create our chat button component as usual. Heading over to the statusBar > ShowChat.jsx, we will be accepting an on-click prop called toggleChat.
// showChat.jsx
<button onClick={toggleChat}
         style={styles.button}>
            <BsFillChatDotsFill />
</button>
Next, in the meeting > MeetingRoom.jsx, we would create a useState hook with a boolean value which we would set to false initially.
// MeetingRoom.jsx

// state to toggle chat
    const [ seeChat, setSeeChat ] = useState(false);
Afterward, we need to create the toggleChat function we passed as a prop to the button.
// function to toggle chat
    const toggleChat = () => {
        setSeeChat(!seeChat)
    }
Great! We can now create a dynamic JSX which would render the ChatContainer.jsx anytime the state is true.
{
          seeChat ? (<Grid>
          <Item>
            <ChatContainer />
          </Item>
          </Grid>) : null
       }
Let us not forget to pass our toggleChat function as a prop to the StatusBar.jsx, which is then passed to the ShowChat.jsx.
<StatusBar toggleChat={toggleChat}
          toggleScreen={toggleScreen}
          handleClickOpen={handleClickOpen}/>
Environment Variables
One last thing we need to do is to safely hide our token endpoint URL and room id which are unique to us. At the root (top directory) of your project folder, create a .env file, copy and paste these important parameters into the file. An example.env file in your starter template illustrates this. Consequently, in your endpoints > getToken.js file, you would have to reference these variables using the process.env object.
Afterwards, add the .env file to the .gitignore file, this prevents it from being tracked by git.
Deployment
This project is deployed on Netlify, which I recommend. When deploying, make sure you save your token endpoint and room id variables in the environment variables tab of your deploy settings on Netlify.
Here’s a LIVE version of the project.
This wraps up this great project, you can get the full source code on GitHub
There are a lot more interesting things you can do with the 100ms. Refer to the official docs here.


