The year is 2022, and Susan doesn't need to queue up at a bank to make an international payment, nor does Alex needs to pay in cash considering the risks involved. Asides from ensuring transaction safety and protecting your website from fraud, payment gateways encrypt your sensitive information including card number, CVV code, and expiration date.
A payment gateway is software that processes credit/debit cards on your website. It transfers the necessary information needed by the bank/payment processor from your device. In the world of digital commerce, it is incredibly necessary to have one on your website or app.
In this article, we would walk through how to integrate payment gateways from two of the most popular payment providers in the African space: Flutterwave and Paystack.
We would integrate payment from both platforms one at a time on a basic React app. You could also use Next.js, there isn't much difference.
This article assumes you are familiar with HTML, JavaScript, and the basics of React. If that is settled, then let's soldier on.
Flutterwave
Flutterwave's payment API is built majorly on TypeScript; it offers both the Hooks and Components methods. I have bootstrapped a basic React app using create-react-app.
Step One
The first step is to install the payment library using NPM or Yarn
$ npm install flutterwave-react-v3

# or
$ yarn add flutterwave-react-v3
Step Two
Let's use the Hooks method.
We will create a file called hooksMethod.js and paste the code below or something similar in it.
If you're using Next.js, you could create a new file under the pages folder. It doesn't matter.
import React from 'react';
import { useFlutterwave, closePaymentModal } from 'flutterwave-react-v3';

export default function App() {
  const config = {
    public_key: 'FLWPUBK-**************************-X',
    tx_ref: Date.now(),
    amount: 100,
    currency: 'NGN',
    payment_options: 'card,mobilemoney,ussd',
    customer: {
      email: 'user@gmail.com',
      phonenumber: '07064586146',
      name: 'joel ugwumadu',
    },
    customizations: {
      title: 'my Payment Title',
      description: 'Payment for items in cart',
      logo: 'https://st2.depositphotos.com/4403291/7418/v/450/depositphotos_74189661-stock-illustration-online-shop-log.jpg',
    },
  };

  const handleFlutterPayment = useFlutterwave(config);

  return (
    <div className="App">
     <h1>Hello Test user</h1>

      <button
        onClick={() => {
          handleFlutterPayment({
            callback: (response) => {
               console.log(response);
                closePaymentModal() // this will close the modal programmatically
            },
            onClose: () => {},
          });
        }}
      >
        Payment with React hooks
      </button>
    </div>
  );
}
Step Three
Looking at the code above, we are required to obtain a public key. For this article, we will be using the test key which I recommend. When finally deploying to production, you can then switch to a live key.
You can get your public key here. After obtaining your key, simply replace it with the one above.
However, it is important to still secure your key from being viewed directly in the code. To do this, take the following steps:
- Create a
.envfile at the root of your react app directory
- your_project_folder
  - node_modules
  - public
  - src
  - .env         <-- create it here
  - .gitignore
  - package-lock.json
  - package.json
- Assign REACTAPP to your API key Inside the .env file, assign the variable name REACTAPP to your Flutterwave API key.
// .env file
REACT_APP_FLUTTERWAVE_KEY=your_api_key
//For example
REACT_APP_FLUTTERWAVE_KEY = 012345
- Add the
.envfile to the.gitignorefile// .gitignore file # api keys .env <-- add this line # dependencies /node_modules
- After completing the above process, run a
git statuson your terminal to ensure the.envfile does not show in the log
- Reference the API key via the
process.envobject To confirm you can now access your API key through this object, kindly add aconsole.logto the reference statement like this:console.log(process.env.REACT_APP_FLUTTERWAVE_API_KEY)
If your API key shows on your console, then you have successfully accessed
your key through the process.env object. If your key does not show,
try restarting your react app again.
This enables you to hide your API key from direct access on the source code.
Please NOTE: this is not a secure method. To keep your key fully safe, render it from the server-side.
Step Four
Now that we have added our public API key, also securing it on the client-side; we can now import our hooksMethod.js file to the App.js file and also render it on the JSX. And that's it! It wasn't so hard, was it?
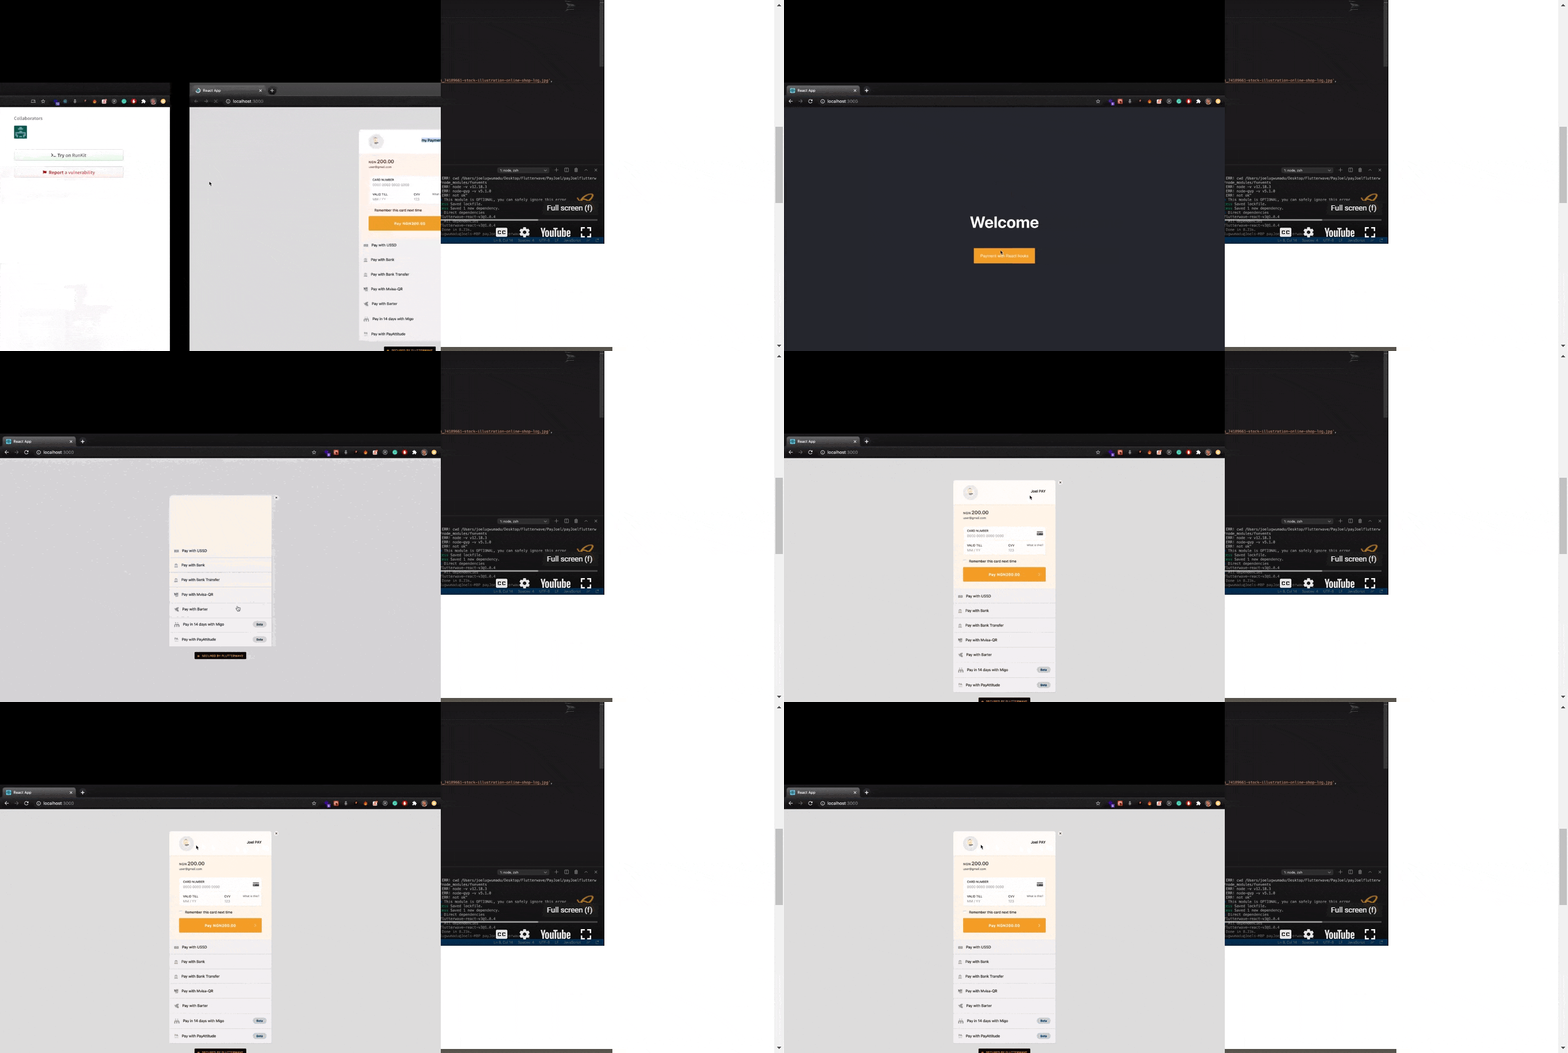
You should see something like this when you click the button.

You can customize your payment link however you want. Feel free to edit the
amount
logo
email
phone number
title
description
and currency
You can use components as well, the process is the same.
Remember, you will need a live key for final production in order to carry out real-life transactions.
Paystack
Here, there are 3 different methods to implement the Paystack payment gateway:
- By using hooks
- By using a button
- By using a context consumer
These are all provided by the Paystack payment library. However, for the scope of this tutorial, only the hooks method will be illustrated.
Step One
Install the Paystack library using your preferred package manager
npm install react-paystack --save
// or with yarn

yarn add react-paystack
Step Two
Navigate to the App.js file (or you could create a separate file, it's up to you), and paste the code below.
However, I would be creating my payment file called checkout.js.
function checkout() {
    const publicKey = "process.env.REACT_APP_PAYSTACK_PUBLIC_KEY"
    const amount = 1000000
    const [email, setEmail] = useState("")
    const [name, setName] = useState("")
    const [phone, setPhone] = useState("")
A set of useState() hooks have been created and they would be passed as values to the name, email and phone fields. The second parameter is used to alter or reset the values.
The amount is set in Kobo, so we shall divide by 100 to get our equivalent value in NGN.
The public key variable is where we shall input the public API key. As stated earlier in the article, using a test key is ideal for development purposes. When deploying to production, switching to a live key becomes a viable option. Furthermore, we are referencing our key using the process.env object for security.
Step Three
Next, an object containing the props which will be passed to the elements rendered.
    const componentProps = {
        email,
        amount,
        metadata: {
          name,
          phone,
        },
        publicKey,
        text: "Pay Now",
        onSuccess: () =>
          alert("Thanks for doing business with us! We hope to see you back soon!"),
        onClose: () => alert("Wait! You need memories. Don't go!"),
      }
The onSuccess method would be called as soon as the user submits their details by clicking the button. Afterward, all input fields would reset their value to an empty value.
The onClose event will display if the user tried to exit the payment gateway without imputing their details. Feel free to customize it to your taste.
Step Four
At this stage, what is left is to render our values by the JSX mark-up. In my version, I used Next.js and added some custom styling through the module.css. It's up to you to style yours however you like.
return (
<div className={styles.App}>
  <div className={styles.container}>
    <div className={styles.item}>
      <div className={styles.overlayEffect}></div>
      <img
        className={styles.itemImage}
        src= {bannerImg}
        alt="banner Image"
      />
      <div className={styles.itemDetails}>
        <p className={styles.itemDetailsTitle}>Starter Service</p>
        <p className={styles.itemDetailsAmount}>NGN{amount / 100}</p>
      </div>
    </div>
    <div className={styles.checkout}>
      <div className={styles.checkoutForm}>
        <div className={styles.checkoutField}>
          <label>Name</label>
          <input
          type='text'
          id='name'
          value={name}
          onChange={(e) => setName(e.target.value)}/>
        </div>
        <div className={styles.checkoutField}>
          <label>Email</label>
          <input
          type='email'
          id='email'
          value={email}
          onChange={(e) => setEmail(e.target.value)}/>
        </div>
        <div className={styles.checkoutField}>
          <label>Phone</label>
          <input
            type='tel'
            id='phone'
            value={phone}
            onChange = {(e) => setPhone( e.target.value)}
          />
        </div>
        <PaystackButton className={styles.paystackButton} {...componentProps}/>
      </div>
    </div>
  </div>
</div>

    )
}

export default checkout
Notice how the values are passed to the state based on the user's input details by the onChange event. Furthermore, every child in the componentProps is being copied by the spread operator to the button element.
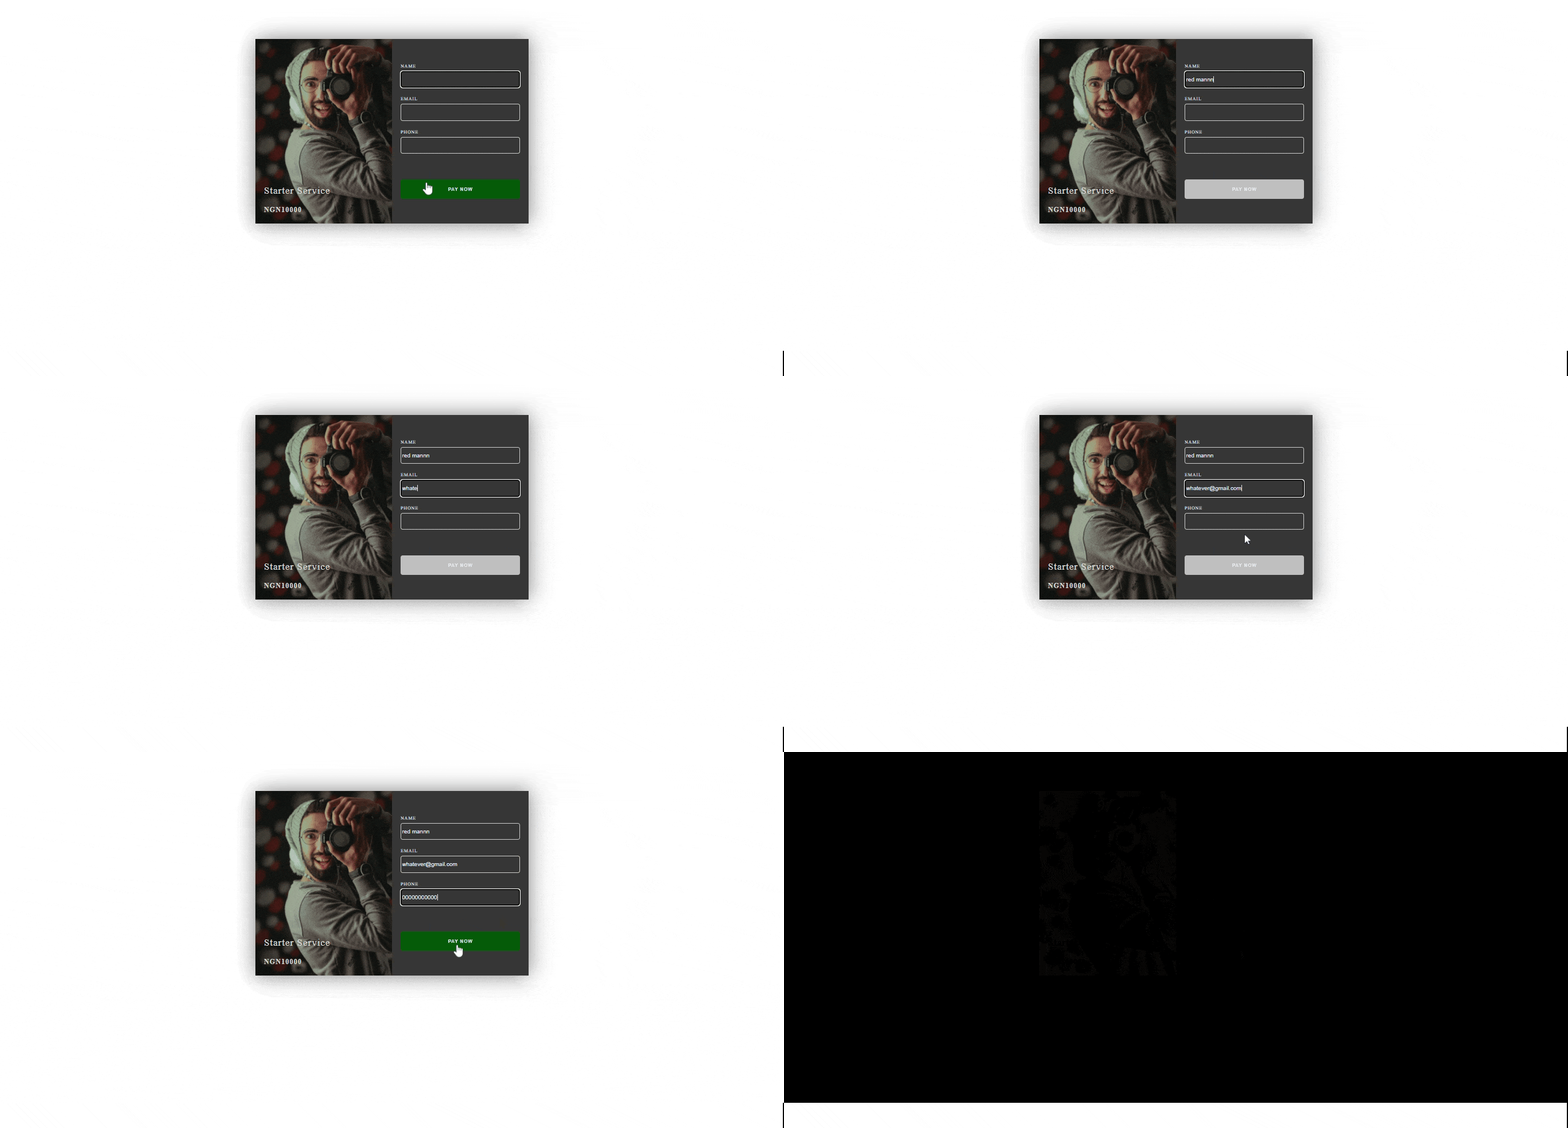
Voila! If the steps were correctly done, the checkout payment should look something like this below:

I added my image and styling, the form can be fully customized to your taste and brand.
It's a wrap, folks! I hope you learned something from this article, it is also noteworthy to know that the process is quite similar using other payment platforms asides from these two. I only used these examples as they are the most popular payment gateways in the African space.
Kindly follow me on Twitter.
Until we meet again, happy coding!
