


Introduction to Git
Git is a version control software that allows the user(s) to keep track of changes in their project as one or more contributors work on the project. Okay, what then is version control?
Let's imagine you are working on a website that gives tips about dogs, that's a version of the website; we will call it version A. Later, you realize you want to change it to a cat website, giving tips about cats, and you made the change; now you have another version, version B. However, you realize that you don't like the new version as it looks unappealing to you, but it would be a cumbersome task switching to the previous version which is a dog site. It would involve having to edit your files manually, change the texts, the pictures, and probably some interfaces like colour and buttons. It becomes manually impossible when many people are working on the project at the same time. This is where git comes in.
Git creates a version of your project anytime you make a commit (details later), therefore you can easily switch back to a previous version. Additionally, git helps you track changes made to any file by showing what new file(s) were added, what file(s) were modified; showing which lines of code were changed. In this way, conflicts are prevented because you can see what your teammates are working on. If you aim to be a top-class developer, learning git is an essential requirement you cannot overlook.
In this article, we are going through the most common git commands.
Prerequisites
You would need to have git installed on your computer. If you don't have git installed, check the links below to install git for your respective operating system:
- Install git for MacOS
- Install git for Windows
-
A GitHub account is also required, with an active repository where you can push the code to.
Note that: GitHub is a code-hosting platform that utilizes version control from git. It lets you and others work together on projects from anywhere. There are other code-hosting platforms such as Bitbucket.
Now, the article assumes you have git installed already on your computer. Let's dive straight in.
Common Git Commands
Git workflow
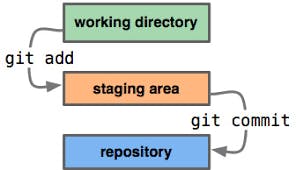
Your local repository (repository on your computer) is made up of three virtual zones:
- Working directory: It holds the actual files of the project
- Index: This is where the files are staged to be tracked by git
- Head: This is where the files are committed to the remote repository ( the one on your GitHub)
Initialise a new repository
git init
This command creates a new repository. It can be used to convert an existing, unversioned project into a git repository or initialize a new, empty repository.
Adding and Committing
Changes or Files can be added to the staging area (index) by the following commands:
git add <filename>   // add a single file


git add .         // add all files
Afterward, proceed to commit the file to the head, so they can be added to the remote repository.
git commit -m "Commit message"
Setting your remote repository
If you haven't connected your remote repository to your local one, you can do so by the following command:
git remote add origin git@github.com:User/UserRepo.git
Now you can push changes and files to your remote repository.
Pushing changes
Now your changes are in the Head of your local repository, they are not on your remote repository yet. You have to "push" them.
git push origin master
After pushing your changes, you should see your code and files on your remote repository created in your GitHub account; the commit messages are displayed on them. Nice job!
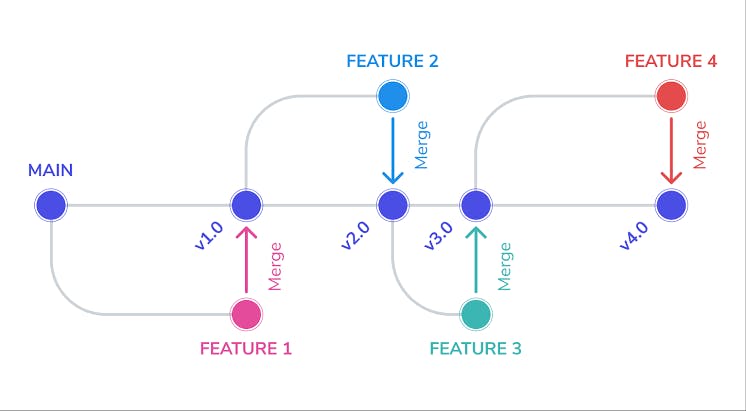
Branches
A branch represents an independent version of your code, independent from the main branch which is the default branch. Initially, when a branch is created, it is usually an exact copy of the main branch, however, changes are made on the newly created branch, tested, before being merged with the main branch. This allows for separate and parallel development.
For example, to create a new branch called feature1, run:
git branch feature1 //create a branch
You have to switch to the new branch by running:
git checkout -b feature1 // switch to the branch
To switch back to the main branch, run:
git checkout main
To delete the branch:
git branch -d feature1 // delete a branch
Pull and Merge
Merging changes from your remote repository with your local repository is done by "pulling" these changes:
git pull origin <branch>
To merge changes in another branch (e.g. feature1) into your active branch (e.g. main), first checkout to the main branch (if not there already):
git checkout main
Then merge the feature1 branch with the main by using:
git merge feature1
After merging, don't forget to stage your new changes on the main branch.
Advanced Commands
Git Log
The git log command shows a list of all the commits made to a repository. You can see the hash of each Git commit, the message associated with each commit, and more metadata. This command is useful for displaying the history of a repository.
The following code shows the difference between git log and git status
git log  // shows the history of commits on the repository

git status // shows the history on the working directory and index only
There are various filter methods used to obtain a particular information from the terminal log, but that is beyond the scope of this article.
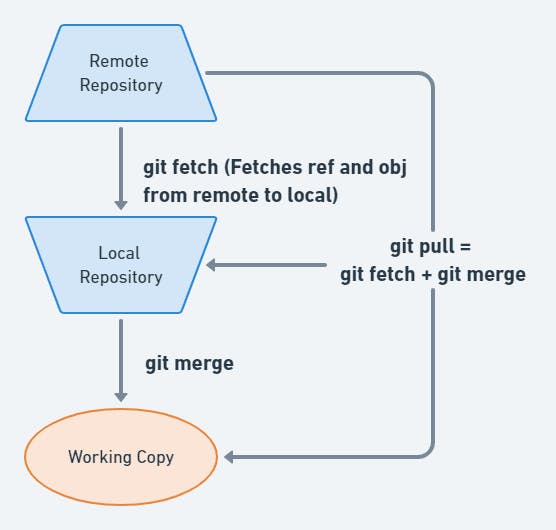
Git Fetch
The git fetch command allows you to get all changes in your remote repository into your local repository but they are not merged into your working directory.
This gives you time to decide on the best course of action for incorporating your changes, such as merging them in or making changes on your local repository first.
It is slightly different from the git pull command which fetches changes from your remote repository and automatically merged them with your local repository. Therefore, git fetch is a safer alternative because it obtains all the changes from your remote but does not make any changes on your local repository.
Git Clone
This creates a clone or exact copy of a remote repository hosted on a code hosting platform like GitHub into one's computer. Usually, during decentralized development like open source, a developer can fork a repository, create his version of the repository, and proceed to clone it into his local computer.
Cloning to a specific folder
git clone <repo> <directory>
Cloning to a specific tag
git clone --branch <tag> <repo>
Where is the remote repository and is the folder targeted
Cloning a branch
git clone --branch <branchname> <remote-repo-url>
This allows you to clone a specific branch rather than the branch the Head is targeted, usually the main branch.
Git GUI
Short for Graphical User Interface is a git tool that allows you to make changes between your remote and local repositories without touching the command line.
Users can make changes to their repository by making new commits, amending existing ones, creating branches, performing local merges, and fetching/pushing to remote repositories all using interface functions. However, it has its limitations, for example, you cannot see a history of your previous changes, but with a low entry barrier, it is worth a try.
If you ever run into errors or conflicts, kindly migrate to the command line, it gives you more flexibility to troubleshoot the problem.
Conclusion
You have to note that this is not an exhaustive list of git commands. Nonetheless, knowing these basic commands is just enough to get you started in the world of collaborative development and versioning.
I hope this article helped you become familiar and comfortable with git. It is completely okay if you forget any command, you can always look it up when needed, from the links provided below. What matters is you understand how each command works before using them to avoid unintended damages.
That wraps it up people, kindly follow me on Twitter
Until we meet again, happy coding!
Useful Resources
You can see a glossary of git commands in this LINK